SWAROVSKI ELEMENTS
Fancy Stones 4120 18 x 13 mm 1 piece Greige
Fancy Stones 4161 27 x 9 mm 2 pieces Indicolite
Fancy Stones 4161 27 x 9 mm 1 piece Jonquil
Fancy Stones 4161 27 x 9 mm 1 piece Olivine
Beads 5000 6 mm 1 piece Greige
Beads 5000 10 mm 20 pieces Marbled Black (or any color you desire)
Supplies
12x Crimping Bead, black, 2 mm,
2x Crimping tube, black, 1 mm
French wire, black, 2 cm
1x Headpin, Silver
1x Jump ring, black, 5 mm
1x Jump ring, black, 6 mm
5x Jump ring, black, 12 mm
1x Setting: 4120/S H20,
18 x 13 mm
4x Setting: 4161/S H20,
27 x 9 mm
1x T clasp, black, 22 mm
Tiger tail, gray, 0.3 mm, 70 cm
Tools
Chain nose pliers
Crimping pliers
Flat nose pliers
Round nose pliers
Side cutter
Tweezers
Illustrations at the bottom of this page
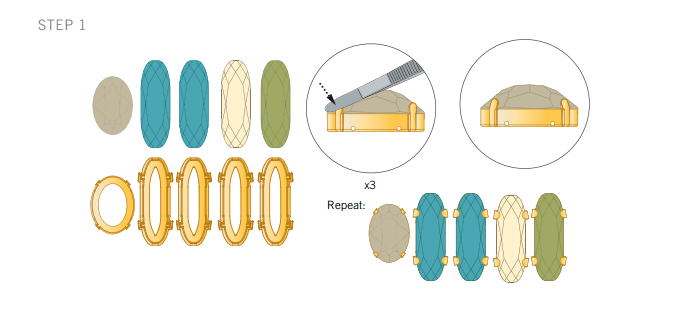
STEP 1: Place the Fancy Stones from the SWAROVSKI ELEMENTS assortment into the settings and press the prongs
gently with the tweezers so that the crystals are secure.
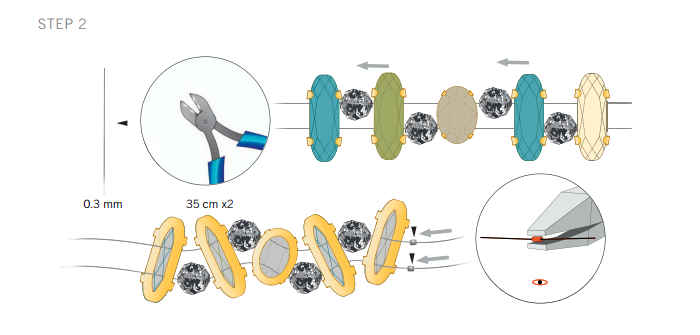
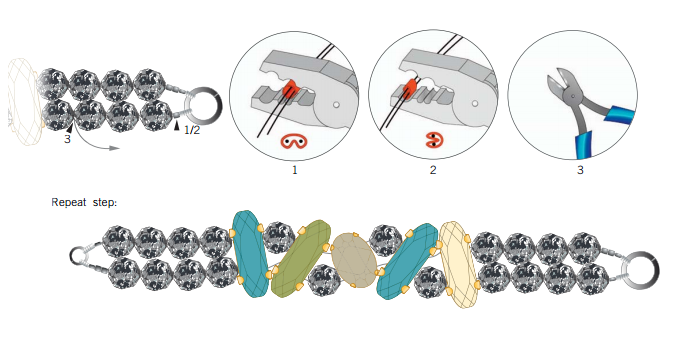
STEP 2: Cut two 35 cm pieces of the tiger tail and string on the SWAROVSKI ELEMENTS you see in the illustration.
Don’t go through the last hole of the fi rst and last setting. The crystals should be positioned in the middle of
the tiger tail. Turn the bracelet over, slide a big Crimping Bead onto each end on the right side and fl atten the
Beads with the chain nose pliers as shown in the illustration.
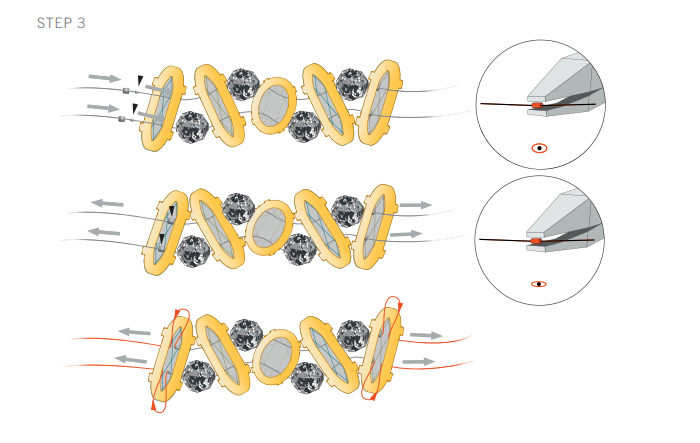
STEP 3: Slide a small crimping tube, then a large Crimping Bead onto each end on the left side of bracelet. Push the
small crimping tube slightly – it should be so fl at that you can put it under the metal of the setting as a space
keeper – it shouldn’t be fi xed! Pull tight so that the Crimping Beads on the right side are also under the metal
of the settings – then pull very tight, so that there is nearly no space between the settings as depicted in the
illustration and fi x the bracelet by fl attening the larger Crimping Beads on the left side. Finally, string the tiger
tail ends through the last hole of the fi rst and last setting. Turn the bracelet over and slide on the Swarovski
Ceramic Bead art. 5000/B 10 mm Marbled Ivory as shown in the illustration.
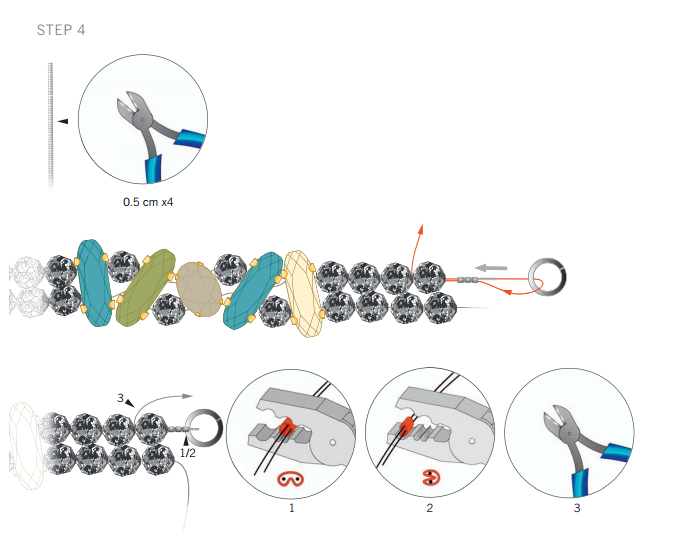
STEP 4: Cut four 0.5 cm pieces of French wire. Slide three Crimping Beads onto the shorter wire end on the right side,
then slide on the French wire. Go through a 12 mm jump ring, back through the Crimping Beads and the last
Swarovski Ceramic Bead. Pull tight and crimp the crimping tube as you see in the illustration. (Just crimp the
Bead directly before the French wire – because the other two Crimping Beads are just space keepers, so the
length of the wire on both ends will be the same.
STEP 5: Repeat step 4 with the short string on the left side, using a 6 mm jump ring. On the shorter wire on the right
side use just one crimping tube and the French wire. Then string the tiger tail through the 12 mm jump ring,
back through the Crimping Bead and through the last three Swarovski Ceramic Beads, pull tight and crimp the
Crimping Bead correctly as shown in the illustration. Finally, repeat this step with the remaining wire as shown
in the illustration (you will be using just one crimping tube and the French wire and you will string the wire through
the 6 mm jump ring).
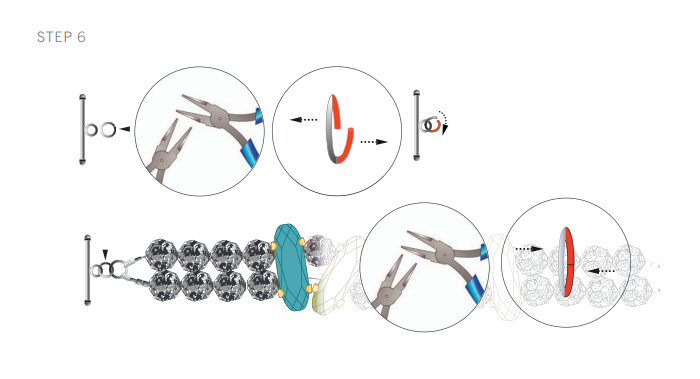
STEP 6: Open the 5 mm jump ring with the fl at nose pliers, attach it onto the T clasp and close it over the 6 mm jump
ring of the bracelet as you see in the illustration.
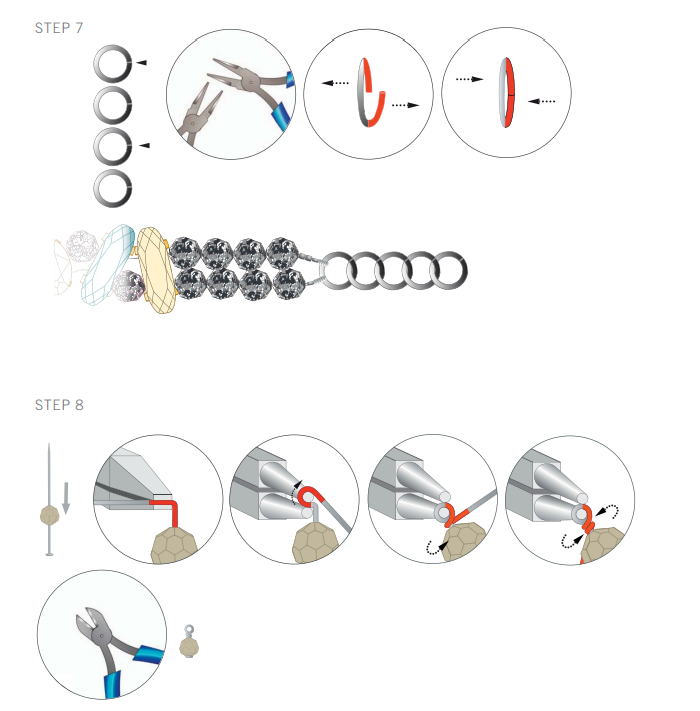
STEP 7: Attach the remaining 12 mm jump rings onto the right side of the bracelet as shown in the illustration. Open and
close the jump rings sideways with the fl at nose pliers.
STEP 8: Slide the Swarovski Bead art. 5000 Greige onto the headpin and bend the headpin with the fl at nose pliers at a
90 degree angle after the Bead. Form a loop with the round nose pliers; wrap the wire back twice as shown in
the illustration and cut off any excess headpin wire.
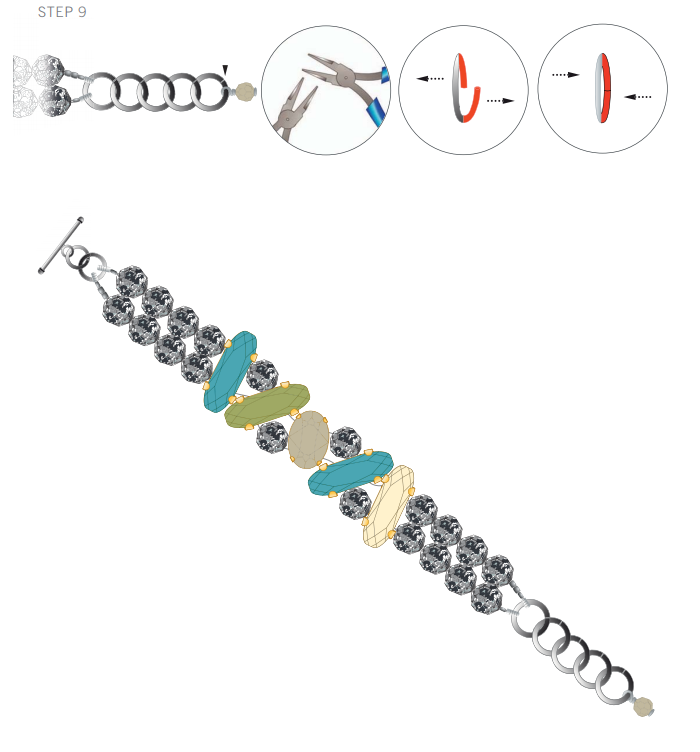
STEP 9: Open the last 12 mm jump ring of the extension chain, attach the beaded headpin and close the jump ring.
