Create A Star-Studded Bracelet That Will Have You Shining Extra Bright This 4th of July!
Wrap your wrist in a simple-to-make, all-American Star-Spangled Banner bracelet made of woven Swarovski crystals. Now get ready for the fireworks, celebrate good times and have a blast making this star-studded design!
Swarovski Crystals
Snap Fastener 1780/114 082 1pc. 11mm Silver/Crystal 001 (contact us for details)
Swarovski Xilion Bicone Beads 5328-3mm Light Siam (422 pieces)
Swarovski Xilion Bicone Beads 5328-3mm Sapphire (358 pieces)
Swarovski Xilion Bicone Beads 5328-3mm White Alabaster (288 pieces)
Supplies and Tools
Supplies: Adhesive tape, white Leather, 12x7cm, metallic silver Leather glue (Güttermann creative HT2) Nylon thread, 2m, 0.3mm, transparent Nylon thread, 3m, 0.15mm, transparent.
Tools: Bead weaving loom, Crystal Swarovski Applicator Hand Tool, Fine needle (no.12) Lighter and scissors.
Level of design: INTERMEDIATE. Take a look at the bottom for text instructions.
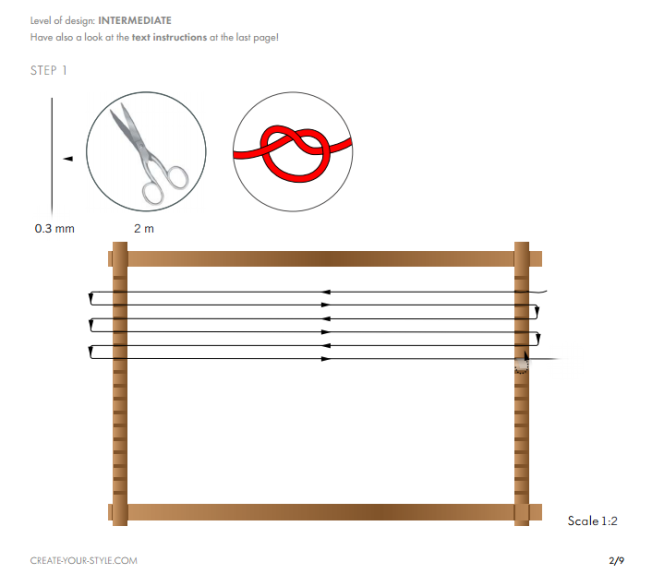
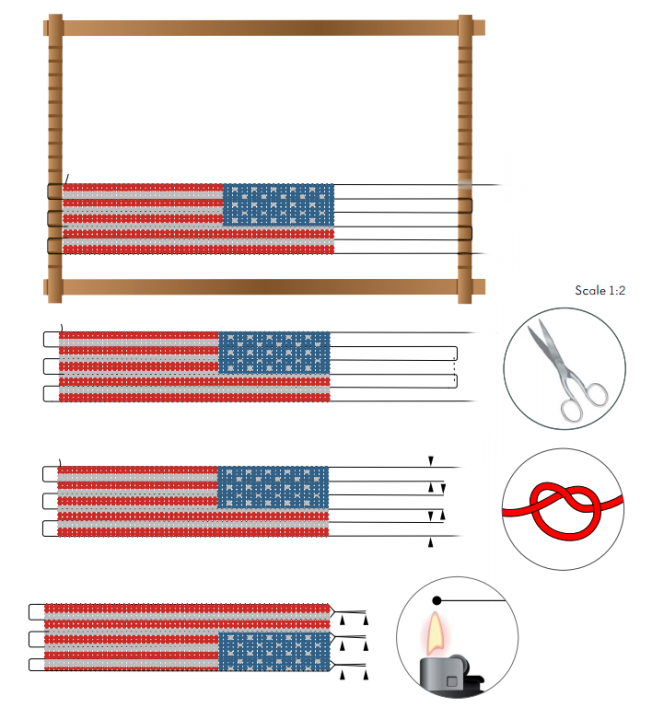
STEP 1: Cut 2m of 0.3mm nylon thread. Tie a single knot onto one end of the bead weaving loom and thread it through the loom as shown in our illustrations with this step until you have 6 horizontal rows. Attach the other end to the loom with tape.
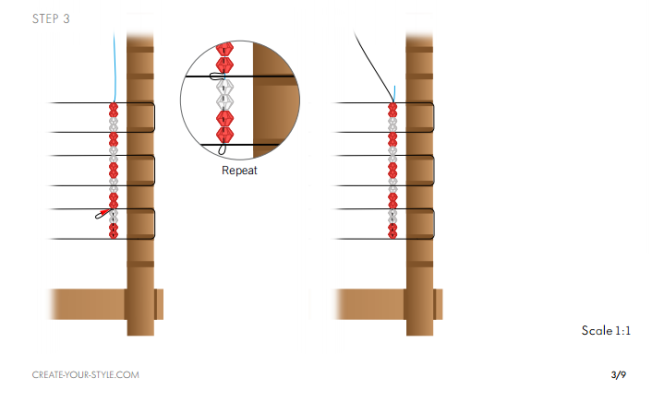
STEP 2: Cut 1m of 0.15mm nylon thread. Tie a single knot onto the end and slide on two Swarovski Bead art. 5328 3mm in Light Siam and two White Alabaster alternating. Repeat 3 times and end with two Light Siam beads. Slide the string underneath all the horizontal strings as shown in the illustration.
STEP 3: Insert the nylon thread back through the beads and each time over the horizontal string until the end. This will produce clusters of 4 beads and then 3 beads.
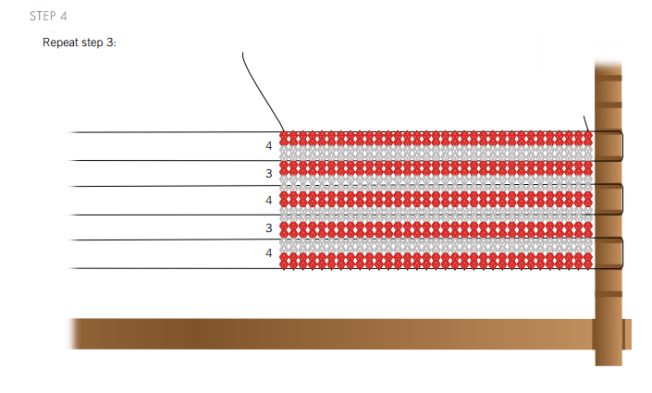
STEP 4: Repeat steps 2 & 3 to get 32 more vertical strings onto the loom.
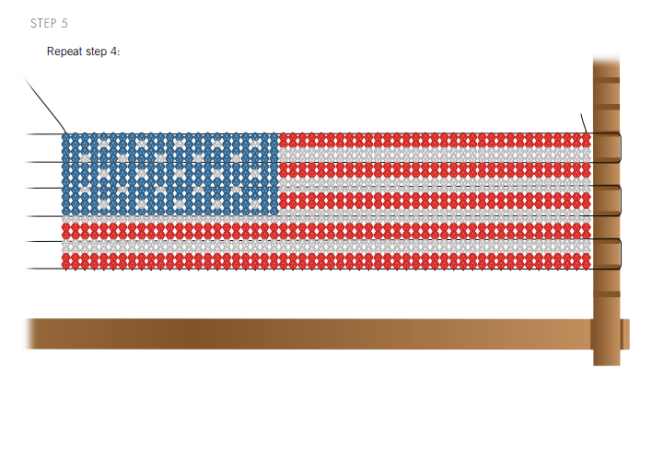
STEP 5: Repeat step 2 & 3, but string on two Swarovski Bead art. 5328 3mm in Light Siam, two White Alabaster, two Light Siam and only one White Alabaster. Then string on 11 3mm Sapphire Beads. Repeat the pattern in this step once more. Continue to string on the same number of Light Siam and White Alabaster beads as done in this step and then refer to the illustrations for the random order of the Sapphire and White Alabaster beads to create the “stars”.
STEP 6: Remove the entire bracelet off the loom. Cut the two joined ends on one side to get six open ends. Tie a knot with the ends and melt the ends closer to knots as depicted in the illustration.
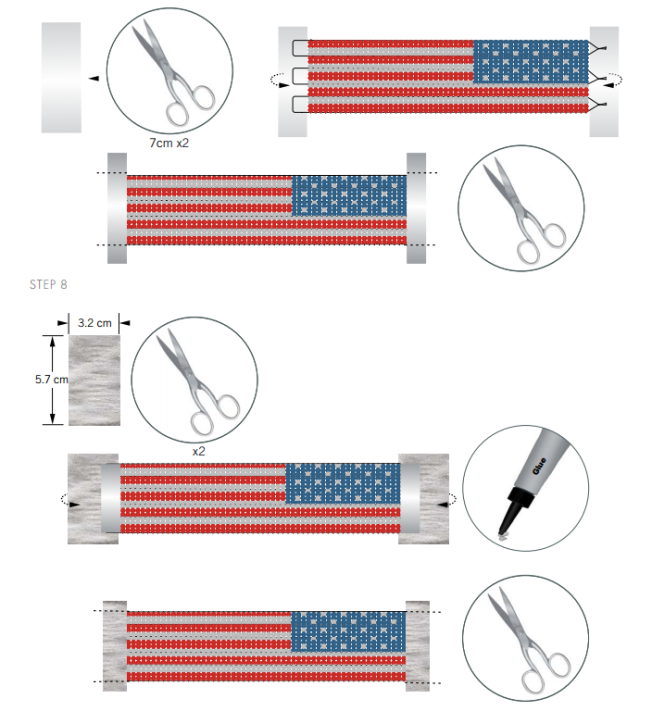
STEP 7: Cut two pieces of 7cm tape and place the tape under the nylon thread ends on both sides. Wrap the tape onto the thread ends and cut off the excess tape.
STEP 8: Cut two pieces of 5.7×3.2cm long metallic leather and glue them onto the bracelet ends so that they are folded into half. Cut off any excess leather.
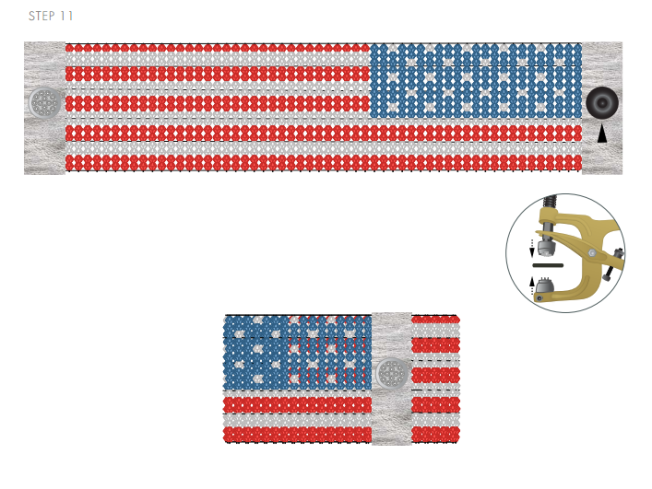
STEP 9: Put the upper and lower dies into the Crystal Applicator Hand Tool that go with the Swarovski Snap Fastener art. 1780/114 082 082 001 11mm. Place the Swarovski Snap Fastener Silver/Crystal into the lower die of the Crystal Applicator Hand tool and place the back part of the Snap Fastener onto the upper die of the applicator. Put the metallic leather part of the bracelet in between the applicator tool and apply the snap fastener.
STEP 10: Change the upper and lower die of the applicator and insert the other pair of dies.
STEP 11: Insert the top and lower part of the Swarovski Snap Fastener into the applicator as done in step 9 and attach it onto the other side of the metallic leather.


