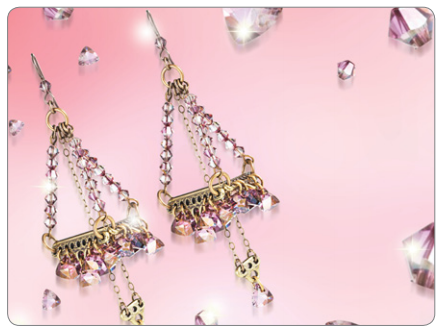
Free Swarovski Earring Design and Instructions

(April) Lilac Showers
Swarovski Elements:
Xilion Triangle Pendant 6628 8mm Crystal Lilac Shadow 32 pieces
Bicone Bead 5328 4mm Crystal Lilac Shadow 44 pieces
Supplies
9" 2mm small brass cable chain
6 pc 9-hole end bar TierraCast® 94-3170-27
2 pc 3-hole end bar TierraCast® 94-3168-27
1 pc earring blank TierraCast® 90-5128-00
16 pc small oval jump rings TierraCast® 01-0016-27
32 pc medium oval jump rings TierraCast® 01-0018-27
8 pc 16g round jump rings TierraCast® 01-0020-2
Instructions
• Step 1: Slip on (1) bicone, Art. 5328 4mm Crystal Lilac Shadow
onto (1) earring blank. Turn a simple loop. Add (1) small oval jump
ring to the loop previous made. Repeat for second side. Set aside.
• Step 2: Using (1) eye pin, slip on (7) bicones, Art. 5328 4mm
Crystal Lilac Shadow and turn a simple loop at the open end.
Repeat 5 times more. Set aside.
• Step 3: Cut chain into 4 equal pieces approximately 2.25" long.
Attach one small oval jump ring to one end of each of the 4 pieces.
Attach one small oval jump ring to (1) piece of chain and to the
outside hole of (1) 3-hole end bar. Repeat once. Using (1) small
oval jump ring, attach it to the second outer hole of the 3-hole
end bar and one of the two remaining chain pieces. Repeat once.
Attach (1) medium oval jump ring to (1) Xilion Triangle Pendant,
Art. 6628 8mm Crystal Lilac Shadow, and to the bottom large hole
of the 3-hole end bar. Repeat once.
Note: you now have two chain components completed. Set aside.
• Step 4: Attach one medium oval jump ring to (1) Xilion Triangle
Pendants, Art. 6628 8mm Crystal Lilac Shadow. Repeat 14 times
more. Attach one triangle component just made to hole number 2,
3, 7, 8 on the 9-hole end bar. Repeat twice more.
Next, attach one triangle component to the large hole on the
bottom of the 9-hole end bar. Use one 16g round jump ring and
attach together two of the 9-hole end bar units using the outside
holes. Attach the last 9-hole bar in the same manner. Note: you
should now have the sides of the earring constructed.
• Step 5: Using the component made in step 2, attach one end to
the large 16g jump ring connector. Repeat for the other two sides.
Note: the crystal eye pins will be dangling free.
• Step 6: Using (1) large 16g jump ring, slip on in order, one crystal
eye pin (from the side of the remaining loop), (1) piece of chain
(from the small oval jump ring on the first chain component
made in step 3), the second crystal eye pin (from the side of the
remaining loop), (1) piece of chain (from the small oval jump ring
on the second chain component made in step 3), the third crystal
eye pin (from the side of the remaining loop), one earring wire
made in step 1. Close ring.
• Step 7: Repeat steps 4 – 6 for the second side.
